
DISPONIBILE IN INGLESE/ITALIANO
AVAILABLE IN ENGLISH/ITALIAN
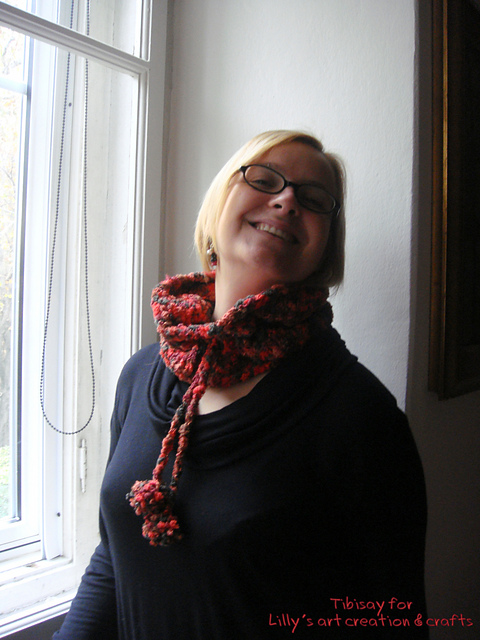

Questo è stato un regalo speciale per una donna speciale.
Ho pensato a lungo alla possibilità di condividere il pattern con voi per realizzarlo. E alla fine ho pensato che a lei avrebbe fatto piacere che il mio primo schema reso pubblico fosse a lei dedicato.
A lei, alla sua allegria, alla sua amicizia, ai suoi post sempre scanzonati, all’affetto sincero, alla sua disponibilità e ospitalità, e per me è come se la conoscessi da sempre.
il modo migliore per ringraziarla per tutto questo era un piccolo pensierino per il suo compleanno :)
A lei, alla sua allegria, alla sua amicizia, ai suoi post sempre scanzonati, all’affetto sincero, alla sua disponibilità e ospitalità, e per me è come se la conoscessi da sempre.
il modo migliore per ringraziarla per tutto questo era un piccolo pensierino per il suo compleanno :)
Lo scaldacollo è di facilissima realizzazione.
This has been a special gift for a special woman.
I have thought long about the possibility of sharing the pattern with you to knit it. Finally I have decided she would have appreciated that my first official public pattern was dedicated to her.
To her, to her friendship, to her easy-going posts, to her honest affection, to her helpfulness and hospitality, that I can say it’s like I’ve known her for ages.
The best way to thank her was a little gift for her birthday :)
To her, to her friendship, to her easy-going posts, to her honest affection, to her helpfulness and hospitality, that I can say it’s like I’ve known her for ages.
The best way to thank her was a little gift for her birthday :)
The cowl is very easy to knit.

TB6 POMPOM COWL – SCHEMA
Lana: Blob, manifattura primavesi
Ferri circolari: 10
Avviare 50 maglie. Preparare le maglie sul cavo per iniziare a lavorare in tondo (io ho usato la tecnica del magic loop), altrimenti è possibile usare un cavo della stessa circonferenza dello scaldacollo.
Giri 1-16: lavorare a diritto tutte le maglie.
Giro 17: (lavorare 2 maglie insieme a diritto, un gettato) fino alla fine del giro
Giro 18-33: lavorare tutte le maglie a diritto.
Giro 34: chiudere le maglie.
Realizzazione del cordoncino: tagliare 3 fili della stessa lunghezza dal gomitolo, calcolando la misura in base all’altezza da cui vogliate che pendano i pompom.
Lavorate i 3 fili come se voleste realizzare una treccia sui capelli. Create 2 nodi alle estremità per bloccare la treccia.
Creare 2 pompom (un tutorial chiaro lo trovate qui)
Inserire il cordino intrecciato nei buchi creati a metà scaldacollo (inserendo l’estremità una volta verso l’interno dello stesso e una volta verso l’esterno) fino a quando il cordino abbia fatto il giro di tutta la circonferenza.
A questo punto non resta che cucire i pompom alle due estremità del cordino.
Non necessita di bloccaggio.
TB6 POMPOM COWL – PATTERN
Yarn: Blob, manifattura primavesi
Circular needles n°10
Cast on 50 stitches. Get your stitches ready on the cable to start working in the round (I used the magic loop method), otherwise you can use a cable whose lenght is the same one of the cowl circumference.
Rounds 1st-16th: knit all stitches.
Round 17th: (knit 2 stitches together, yarn over) to the end of the round.
Round 18th-33th: Knit all stitches.
Round 34th: Bind off.
Work the string: cut 3 threds of the same lenght from the ball of yarn, the measure will depend on how long you would like to have your string with pompoms around the cowl.
Work the threds as you are plaiting someone’s hair.
Make 2 pompoms (you might use this tutorial)
Put the string into the holes made on the cowl (putting the tip once inwards, once outwards alternatively) until the string has wrapped all the cowl around.
Sew the pompoms on the tips of the string.
You don’t need to block it.


.jpg)


%2Bnew.jpg)


